Sunday, July 8, 2012

My First Quilting Job


My husband gave me a sewing machine at Christmas, as I have had a desire for a while to learn how to sew.  I have never sewn before, but I've watched my mom and grandmother do it, so I had the general concept of how to do it.  After practicing on a scrap of material for like an hour, I was ready actually try something because I learn better by doing, in this case by making something rather than just sew in a straight line.  I decided that I should start small.  I would LOVE to be able to make some large quilts, but I realize I'm very far away from that, plus the thought of doing one of those scares me.  I decided to start out with something small.  Which I figured would be baby sized things, as they are small and I could use them down the road when the time comes, as I don't care what they look like.
All ready to start!


All ready to start!
I found a website with some free patterns and found one that seemed the easiest, a diaper changing pad.  It's small, only has three rows of five rectangle blocks in it and a backing.  Easy enough.  So I started out making this.  Cutting the blocks took a lot of time, which made me had an appreciation for all those out there who make big quilts (ex. my sister-in-law!).
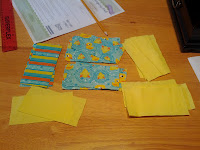
Blocks are all cut out and ready to go.


I later found out, from my wonderful sister-in-law that there are tools you can use to cut the material which make it easy and quick, instead of my way which was tracing the shape on a piece of paper and then pinning it to the material and cutting it out with scissors.  I have learned a very important lesson from this...cutting quilting blocks out like this make the sides uneven and very hard to sew together.


The blocks are coming together!
Alas, I got them together!  It turned out that it wasn't as hard as I thought it would be.  It became a lot easier when my sister-in-law also told me about this 1/4 inch seam foot which helps you sew a perfect 1/4 inch seam, which really worked!  Another great lesson learned, as trying to do it yourself is a lot harder than it looks!

The end product turned out better than I imagined.  Still not something that I would give anyone, but I'm still pretty impressed that it doesn't look half bad.


:D


Garlic Cheddar Biscuits


Alright, so here is my first blog about food!  I’m sure many more will come!

I found this recipe for Garlic Cheese Biscuits just like the ones Red Lobster make.  My husband LOVES these biscuits.   He makes you bring a big purse so that you can take the extras home.  Not I haven’t had to do that because we don’t get to Red Lobster much (but I have had a loaf of bread or two in my purse from East Side Mario’s before), but his sister told me about how he would do this when they were younger, and I definitely believe it!  So when she found this recipe on Pinterest, she passed it along and I haven’t heard anything but “when will you make my Red Lobster biscuits?” since.  Finally I decided to make them.  We ate 8 in one sitting!  We had them gone in two days so I made another batch.  I have found that the hardest part to this recipe is waiting for them to bake!  They are so super easy, I don’t know why I waited so long to make them!  So if you like biscuits, you like cheese and you like garlic, go out and make them!

Garlic Cheddar Biscuits
(from http://gimmesomeoven.com/garlic-cheddar-biscuits-a-la-red-lobster/)

Ingredients:

2 cups buttermilk biscuit mix (such as Bisquick or Jiffy)
1 cup grated cheddar cheese
1/2 tsp. garlic powder
2/3 cup milk
2 Tbsp. butter, melted
2 tsp. dried oregano
1/4 tsp. garlic salt
Method:

Preheat oven to 400 degrees. Prepare a baking sheet with cooking spray.

In a large bowl, mix together biscuit mix, cheese and garlic powder. Add in milk, and stir until well mixed. (Heads up – the dough will get very sticky!)

With a spoon or with your fingers, shape the dough into biscuit-sized clumps, and drop onto the baking sheet. (Note that the dough will pretty much hold its shape when baked, so feel free to pat down random peaks in the dough if you’d like them to look more uniform!)

Bake for 10-13 minutes, or until biscuits begin to brown slightly around the edges.

While the biscuits bake, prepare the warm butter mixture by mixing together the melted butter, oregano and garlic salt in a small bowl. As soon as the biscuits are removed from the oven, brush the biscuits (while they are still on the baking sheet) with the mixture until they are well-coated.

Serve warm.

(*This recipe usually makes about 15 biscuits for me.*)

Drool......