Sunday, September 23, 2012

Peach Crisp

My weekend without John went by fairly quickly and productively.  I was able to clean the house yesterday and do a few extra cleaning type things (clean up my garden, clean out and organize the bathroom cabinets, pack away my summer clothes, bring out the fall clothes and get rid of some jeans).  Today I was able to relax and enjoy some time with God.  It was such a beautiful fall day.  I love the changing of the seasons and right now I am loving the fall weather, especially after the hot hot summer we had.  I just want to be outside going for walks and bike rides and be inside baking!  It's the perfect time to have the oven going with lots of fall treats.  Normally at this time of year I am baking lots of apple crisps, well all year round I do that, but this is the time of year that apples are being harvested, so you tend to make them a bit more now.  But today I had some peaches that I needed to use up, so I thought that I would try a peach crisp, something I've never made before.

Since I've never made a peach crisp, I learned a few things about baking with fresh peaches today.  I've never had to peel them before and began with a paring knife and was just going to go at them, but as I started I realised that it was probably going to take me forever to do it that way.  So after looking up online (and a little advice from my Nanny who I was talking to on the phone), I decided it would be better to boil them and then dunk them in ice water to get them off.


Now I'm not sure if I did something wrong in this process, but it seemed to take forever to get the skin to want to pull off completely.  I finally ended up taking a knife to a couple of them, but it was still probably easier than how I was originally going to do it.  Most of them ended up having the skin pull off, even if it was in sections.

The first of many peaches to be peeled.

Once the peaches were done, everything else went easy, just mixed up the topping, put it on and let it bake.  I showed John the finished product over the webcam tonight and he said the only problem with me making it while he was gone was that he couldn't have any.  Looks like I'll be making another one when we get back from Hawaii, which I'm fine with because this recipe was delicious!!

mmmmm good :)

Juicy Peach Crisp
(from Allrecipes.com: http://allrecipes.com/recipe/juicy-peach-crisp/detail.aspx?event8=1&prop24=SR_Title&e11=juicy%20peach%20crisp&e8=Quick%20Search&event10=1&e7=Home%20Page)

Ingredients:
6 fresh peaches - peeled, pitted and sliced
1/2 teaspoon almond extract
1 cup all-purpose flour
1 cup white sugar
1/4 cup brown sugar
1/2 teaspoon ground cinnamon
1/4 teaspoon salt
1/2 cup butter

Directions:
1)  Preheat an oven to 375 degrees F (190 degrees C), and grease an 8 inch square baking dish.
2)  Place the peaches in the bottom of the baking dish, and sprinkle them with almond extract.
3)  In a bowl, combine the flour, sugar, brown sugar, cinnamon, and salt. Cut the butter into the flour mixture with a pastry cutter until the mixture resembles crumbs.
4)  Sprinkle the flour mixture in an even layer over the top of the peaches, and bake in the preheated oven for about 45 minutes, until the peaches are bubbling and the topping is browned.

Saturday, September 22, 2012

The Bed the John Built

I have been very bad at blogging lately.  We've been so busy as of late that I just haven't had (or made) the time to sit down to write some blogs.  But I'm going to change that now!  John's off to Hawaii today for work (I know, rough job he has), so my plan (or hope) is that I can blog every day he's gone AND while I am down in Hawaii too (as I'm joining him next week :) ).

So, blog #1 - the bed the John built.

In late July we finally decided that we needed to buy a new mattress.  We had been talking about it probably since we first got married, but put it off because it was going to be a big purchase.  More recently we had been talking about it more and had toyed with the idea of asking our families for money towards a new mattress for Christmas, but the last week of July we both had had enough of bad sleeps and John was having a hard time getting to sleep (which does not happen for him), then finally we decided we just needed to do it.  So we went out mattress shopping and bought a lovely new high mattress.  I say high because our old mattress is like 6 inchs high...

 Here are two pictures of our Ikea bed frame with both mattresses in them for comparison.
Low Ikea bed

New Mattress in Ikea bed
There is such a huge difference that for the first couple of days I felt like I was going to fall out of bed!

Now along with this new mattress, we also needed a new bed frame, as our Ikea one has been moved twice in the rain and particle board doesn't stand us as well after that.  So John decided that he wanted to make a bed.  He's has a strong desire to learn to woodworking and would like to make furniture for us, so this was the perfect chance for him to get started.  Plus beds are easy to start off with.  He had to stay home to wait for our mattress to be delivered, so he took the day off so he could make the bed.  Here is a progression of his work throughout the day (he posted them on Google+ for me to see how it was going while I was at work).


The whole thing came together quicker than I expected, which was great because it meant we got it up to our room quicker.  The only downside to the whole thing is that I have to literally climb into bed, because it ended up being a bit taller than he expected.  But as I've gotten used to it now, I'm more ok with it because it is so much better than practically getting up off the floor.

Here is a picture of the final product.  Not bad eh?


I am so proud of him for how it turned out.  I love that he likes working with his hands and wants to make things.  It reminds me of my Poppy who made many different things for me throughout my life which have all been so special.  I'm excited to see all the future things John will make and for him to grow in his skill, for now I think he's off to a great start!  Next step, bedside tables, so that we don't have to get our of bed to open the bottom drawer!

Thursday, August 23, 2012

Apple Crisp

I decided to make a dessert last night that involved apples as I had a couple apples going bad.  Originally I was going to make a pie, but when I asked my husband if he wanted an apple pie or an apple crisp, he said crisp. Now is a big deal because he likes his pie, as most people do, but my apple crisp is probably his favourite dessert that I make, which explains why we have it pretty regularly in the fall and winter.

This recipe came from a cookbook my Mom and Nanny put together for me before I moved away from home for school.  They put all my favourite recipes and some of theirs into this book and this was one of them!  I really enjoy this recipe, not only because it tastes so good, but also because it is so simple to make and you (should) always have the ingredients on hand:

Apples - we always have apples and
you only need 2 of them to make an 8x8 pan side


2/3 cup of butter - always have butter

2/3 cup each of flour, oats and brown sugar -
again, always have these things

Put on top of apples, bake for 30-40 mins at 350

AND ta da!  This is what you get...

So simple...


...so good!

Another great thing about this recipe is that is it so simple to whip up and quick to cook, that if you have an unexpected guest for supper or not enough time to prepare ahead of time, you can quickly put this together and let it cook while you are enjoying your meal and conversation!

Apple Crisp

2/3 cup flour
2/3 cup oats
2/3 cup brown sugar
2/3 cup melted butter

Preheat oven to 350.  Peel, core, slice and place 2 apples in an 8x8 pan.  Mix above ingredients.  Place on apples.  Cooke for 30-40 minutes. Voila done!
(I have made this in a 9x11 pan too, but then I double the recipe, adding a little extra of the dry ingredients and butter until it covers the apples)


Tuesday, August 21, 2012

Family Camping 2012

This past weekend we were camping at Presqu'ile Provincial Park with my parents and friends from my church back home.  We've been doing it for 21 years this year! (I haven't been to all of them, but the majority of them!).  I'd like to share a brief (or as brief as I can make it) overview of my years family camping.

Childhood Years
We started out going to Balsam Lake Provincial Park and getting a group camp site and everyone would tent camp.  It was so much fun as a kid.  Those weekends are some of my favourite ones from my childhood.  The camp site we used to get when I was a kid was surrounded by forest and lots of secluded spots, so we used to play in the woods and these secluded spots from the time we got up til the time we went to bed.

Granted, that was when we weren't down at the beach, which basically was most of the afternoon on Saturdays.  My dad used to throw my sister and I over and over again in the water until he got too tired to throw us! And then we always had a football or another type of ball that we threw back and forth in the water, usually the dads with the kids. The campground used to have a chip truck that we would always go to in the afternoon and get french fries or ice cream as our Saturday afternoon treat.

We also used to play a ton of games, kids and adults alike!  I remember playing hours of Dutch Blitz with 2 decks, meaning their were twice as many hands flying around!  Playing the classics of Uno, Yahtzee, Skip-bo etc. And then there was Wizard.  In this group, Wizard is a big deal, its the game that is played whenever this group got together, family camping or not.  I can remember the adults playing it late into the night (ok, some of that may have been stories I heard) and then I remember learning how to play and getting to join games!  I found this to be a big deal, as everyone always played and I wanted to be apart of it!

Then came the time when the kids started getting older and were able to have their own tents. Let me tell you, as a pre-teen, there is nothing more you want than having your own tent or sharing with a friend instead of your family! (no offence Mom, Dad or Keren!)

The worst memory of this is the vault toilet.  Have you ever smelt one of those?  Or tried to use one without breathing in or gagging?  Let me tell you, it's not easy and it's not fun.

Years of Change/Teen Years
I only have vague memories of my teen years family camping, as the years sort of smooched all together, I forget what happened when.  But I do remember that during this time I missed my first family camping *tear* and that while I was working at camp, my lifelong bud, Michael and I would either get picked up or train to and from family camping by a combination of Tim and Sabrina, my grandparents, and both our parents.  As you can see, this was very important to both of us!

During this time we had to start trying other campgrounds as, Balsam wouldn't let us camp on the group camp site anymore due to the new park warden following the rules (they need to have X amount of children for X amount of adults...psh...).
Other campgrounds I remember:
Emily Lake Provincial Park - All I remember is that it was like 15 minutes away from home, so when Mom forgot the lunch meat, Dad was able to drive home to get it and the beach SUCKED!  I'm sorry Emily Lake, but you are the last lake I want to swim in.
Sibbald Point Provincial Park - all I remember is that the group sites were almost right on top of each other, there was a large group of teens that came and blasted their music all day and night and I think this was when we had the fireban where the fire had to be put out by 9pm and "Fireman Doug" would put it out at the stroke of 9pm.  I also believe that policeman Doug was working so he would go to work and come back to camp.
Fenelon Falls Campground - this one wasn't too bad, but there was no beach, only a pool and the group campsite had no shade, so it was sun 24/7 (or until the sun went down).  We went there twice.

Finally after these not as fun experiences, we returned to Balsam on individual sites in the same area, as we all enjoyed Balsam the best and we could have water and electricity on each site.  Now this was the beginning of a the end of true family camping I would say (i.e. no hydro, no water, vault toilets and sleeping on the ground in tents - which I'll admit this year, I caved into).  Once we got our electricity and water, toasters, plugged in kettles and stereos were there, then my parents got one of those beds which raises them off the ground, then one couple got trailer, then my parents got a trailer - basically everyone got old and needed more comfort!  It has changed the dynamic a bit and gave me a reason to bug my parents, which was is always needed, I think.

Presqu'ile Provincial Park
Enter the Presqu'ile years.  Last year, my friend, Sabrina, and her family weren't going to be able to go family camping because they had to go to visit her in-laws in England for a family wedding, so we started talking and decided to plan a different weekend to go camping and look around for somewhere else to go.  We found Presqu'ile, which had group campsites!  We invited everyone who normally goes family camping and ended up having to family camping weekends!  Not everyone could make it, but out of those who did, we found Presqu'ile to bring back the fond memories of the group campsites, being able to bond better and let the kids run around while the adults hang out.  We decided that this would be our new home for now.  This weekend we had our first "official" family camping weekend there, and I thoroughly enjoyed it.  All these memories were coming back and I felt like we were better able to enjoy each others company, which I think was the whole point from the beginning!

Now one of the best things about Presqu'ile is the "Presqu'ile Wanderer".  He likes to prowl at night to see what he can find, once he found a box of smore's fixings, which just kept bringing him back!  While some are scared of him, others stand up to him and scare him away!  Can you guess what he is?

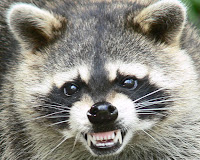
The Presqu'ile Wanderer
(Note: not the actual one)

Adult Years
Finally, just a short note about going camping now that I'm grown up and married.  First thing, is that I love being able to having John come with me and join in on these weekends.  This group of friends have been like a family to me, so I enjoy seeing him interact and join the group, but also just having him see a glimpse into my past.  I feel like it helps us get to know each other better.

Also, it has been interesting to join the adult conversations which either bored me as a child, I was not around for or was not privy to.  I can see that some of these relationships have changed, but for the better, as I enjoy hearing some of the things or jokes I've never heard some of them say and be slightly shocked.  I'm seeing them less and less as so & so's mom or dad but as them for themselves, which I enjoy but also takes a little getting used to!  

All in all, family camping is one of my favourite times of the year and I look forward to doing it for another 20+ years!


Thursday, August 9, 2012

Marshmellow Squares


The other week a made these very yummy marshmellow squares for some girlfriends and I.  It's one of John's grandmother's recipes.  If you know Grams, then you know her cooking and you know it is good.  This was one square of her's that as soon as we had it, we had to have the recipe and then it went into my ever growing pile of "going to make this one day" and there is sat for like a year until I decided to make them.  Let me tell you, they were soooo good.  Especially because it was fresh out of the oven and wonderfully gooey.


Just before going into the oven
Now my version of these squares were a little more doctored up as I sort of  eyeballed some of the measurements and the recipe called for mini-marshmellows and I only had large.  My suggestion - if you don't like marshmellow that much, then use the mini, as the large over takes the top of the squares.  Point in case here:
Right after coming out of the oven
 All in all, I think that they were a hit as the girls loved them, going back for seconds!
Side View

Marshmellow Squares Recipe a la Grams

Preheat oven 350"

1 1/2 cups Graham Crumbs
1/2 cup Butter

Mix crumbs and butter

1 1/2 cups of Coconut
1 1/2 cups of pecans
1 1/2 cups  semi sweet chocolate chips
1 1/2 cups of  miniature marshmallows (2 cups if you want to make sure all of the pan  is covered OR just use 1 1/2 cups of large!)
1 can (300L) sweetened Condensed Milk

LAYER coconut, nuts, chocolate chips and marshmallows evenly over crumbs.

DRIZZLE condensed milk evenly over top.

BAKE for 25-30 minutes or until golden brown. Remove from oven and cool and cut into squares

Monday, August 6, 2012

Giant Cookie

There comes a time in every young wife's life when she says to herself "I want to make something special for my husband today".  For me, there was only one answer to this, a giant cookie.  I found a recipe on Pinterest  for a Giant Cookie, the only problem was that it was for a chocolate chip cookie, which John doesn't like (I know, shocking!), so I made a few changes and voila, a giant oatmeal raisin cookie (oatmeal raisin being John's favourite).


To start with, you need to cream white and brown sugar and butter together. Then add an egg, baking soda, cinnamon, flour, oats and flour and mix.


I found that after mixing everything, it was still a little dry, so I added more butter than what the original recipe called for.  I think that this was due to the oats.


Once everything is mixed well, place it on a 11x17 baking sheet and shape it into a 9-inch circle.  The original recipe called for it to be  cooked between 13-16 minutes, but I found it needed closer to 25 minutes, but that could be because I didn't flatten it enough.


And viola!  Giant Cookie :D


Giant Cookie Recipe
(This is based off my changes, click here for the original recipe)

INGREDIENTS:
1/2 cup white sugar
1/2 cup packed light brown sugar
1 cup butter, melted and cooled
1 egg
1/2 teaspoon soda
1/2 teaspoon salt
1/2 teaspoon cinnamon
1 1/2 cup flour
3 cups oatmeal
2 cups raisins


DIRECTIONS:
Preheat oven to 350 degrees.

In a medium bowl, cream together the sugars and butter. Add the egg and vanilla and mix. Add the dry ingredients and mix well.

Line a large (11X17-inch) baking pan with foil and press the cookie into a circle. I press my cookie into a 9-inch circle, about 1/4 to 3/8-inch thick. When it bakes, it spreads to about 11 inches, which fits perfectly onto a 12-inch round cardboard circle you can find at most craft stores.

Bake for 13-16 minutes (or more depending on thickness) until the cookie is lightly golden brown. Let the cookie cool completely on the baking pan – this helps the cookie stabilize and set so it can be easily lifted off the pan. Once cool, gently use the foil to lift the cookie off the pan.


I think he liked it!


Sunday, July 8, 2012

My First Quilting Job


My husband gave me a sewing machine at Christmas, as I have had a desire for a while to learn how to sew.  I have never sewn before, but I've watched my mom and grandmother do it, so I had the general concept of how to do it.  After practicing on a scrap of material for like an hour, I was ready actually try something because I learn better by doing, in this case by making something rather than just sew in a straight line.  I decided that I should start small.  I would LOVE to be able to make some large quilts, but I realize I'm very far away from that, plus the thought of doing one of those scares me.  I decided to start out with something small.  Which I figured would be baby sized things, as they are small and I could use them down the road when the time comes, as I don't care what they look like.
All ready to start!


All ready to start!
I found a website with some free patterns and found one that seemed the easiest, a diaper changing pad.  It's small, only has three rows of five rectangle blocks in it and a backing.  Easy enough.  So I started out making this.  Cutting the blocks took a lot of time, which made me had an appreciation for all those out there who make big quilts (ex. my sister-in-law!).
Blocks are all cut out and ready to go.


I later found out, from my wonderful sister-in-law that there are tools you can use to cut the material which make it easy and quick, instead of my way which was tracing the shape on a piece of paper and then pinning it to the material and cutting it out with scissors.  I have learned a very important lesson from this...cutting quilting blocks out like this make the sides uneven and very hard to sew together.


The blocks are coming together!
Alas, I got them together!  It turned out that it wasn't as hard as I thought it would be.  It became a lot easier when my sister-in-law also told me about this 1/4 inch seam foot which helps you sew a perfect 1/4 inch seam, which really worked!  Another great lesson learned, as trying to do it yourself is a lot harder than it looks!

The end product turned out better than I imagined.  Still not something that I would give anyone, but I'm still pretty impressed that it doesn't look half bad.


:D